
Delish Gluten Free Lemon Bars
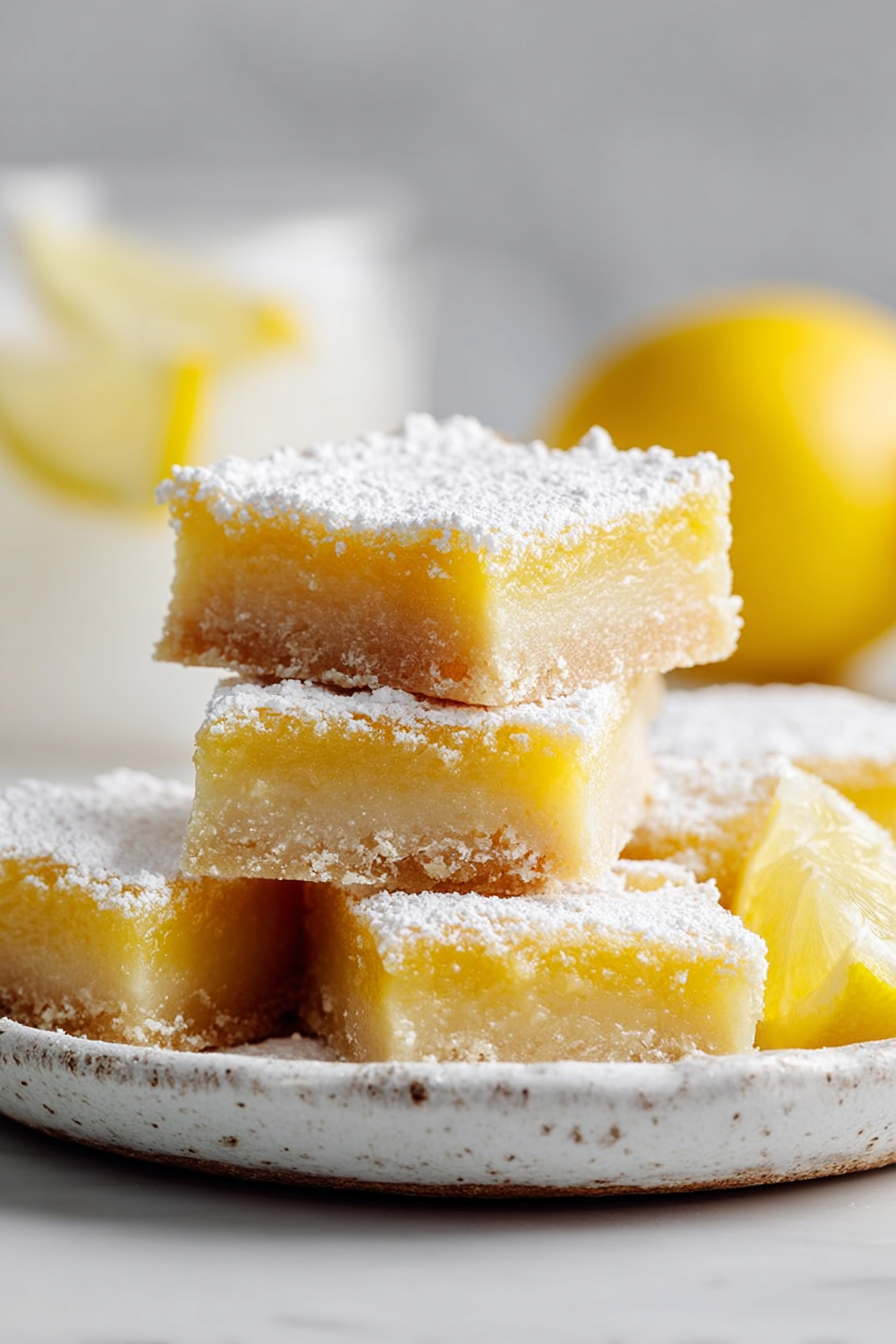
There’s something about lemon bars that always feels like a little square of sunshine on a plate. These Delish Gluten Free Lemon Bars are bright and tender, a soft citrus hug for days that need a lift. They have that gentle snap of a buttery, sandy crust under a silky lemon top—tangy enough to wake you up, sweet enough to feel like a treat, and dusted with a whisper of powdered sugar that always manages to float into the air like snow. They’re simple in spirit, unfussy to love, and surprisingly kind to make on a slow afternoon. If you need a dessert that feels both homey and fresh, this is it.
The reason these bars feel special in our house is how they bridge everyday life and little celebrations without asking much from me. They’re the sort of dessert I can begin with a half-drunk cup of coffee beside me and a window cracked open just enough to hear the neighborhood waking up. They take well to the rhythms of family life—the pauses, the interruptions, the quick return to the bowl. And when they emerge, golden and softly fragrant, they carry all that calm right to the table.
MORE OF OUR FAVORITE…
I’ll admit: lemon bars rarely last long around here. My husband has a habit of pretending to straighten the powdered sugar, which is his code for sneaking a corner piece. Our youngest treats the cooling rack like a treasure map, scouting for which slice looks the most lemony (their words, not mine). The dog settles in by the oven door, convinced that patience is a virtue and crumbs are blessings. Honestly, I can’t argue.
One Saturday in spring, I started a pan while our daughter was practicing a song for school in the living room. The morning sun was steady and warm, and I could hear her voice, soft and brave, floating through lemon-scented air. I over-zested one lemon and laughed when my hands smelled like a whole orchard. The kitchen radio hummed quietly. Somewhere between zesting and pouring, a rogue spoon clattered to the floor. Our dog looked at me as if to say, “I’ve got it,” and I had to hustle to get there first. It wasn’t a perfect bake—there was a tiny crack along the top and the first dusting of sugar promptly melted in—but we cut squares anyway, and they were bright and wonderful and exactly the kind of cozy we needed.
By the time the bars cooled, the kids had wandered back in, drawn by that lemony glow that seems to sneak under doors. My husband made tea, I poured more coffee, and we stood around the counter like people do when something brings them together. We ate quietly, with the soft crunch of crust and the tender sigh of citrus, and that felt like a good morning well spent.
Why You’ll Love This Delish Gluten Free Lemon Bars
– The lemon scent fills your kitchen in a way that feels like opening the windows on a sunny day—fresh, bright, and a little joyful.
– A tender, sandy crust that manages to be both buttery and light, with a silky lemon layer that settles into the sweetest little tang.
– Easy to share, easy to pack, and even easier to nibble while standing at the counter.
– Naturally cozy for brunches, birthdays, or just a Tuesday when you need something cheerful.
– They’re gluten free without feeling “different”—just honest, delicious lemon bars that everyone reaches for.
– Lovely chilled from the fridge, when the citrus sharpens and the texture turns extra velvety.
Slow Moments
There’s a small ritual I love each time I make these. The zesting comes first—tiny green flecks of brightness on the cutting board and that fresh, lemon-oil perfume that clings to your fingers. I always pause to breathe it in, like a reset. The juice follows, and there’s that little hum of satisfaction when the lemon yields more easily than you expected.
Stirring is unhurried. A lazy swirl with a whisk while the radio murmurs and the dog sighs. The pan gets lined, and I press the crust down with the bottom of a measuring cup, just enough to feel it go from sandy to snug. There’s a second of quiet as everything settles in the oven. I like to lean against the counter, sip what’s left of my coffee, and watch the light shift across the stove.
When they’re done, the kitchen smells like summer and baking day all at once. Waiting for them to cool is its own kind of calm. There’s a tiny drum of fingers on the countertop. Maybe a kid wanders in to ask, “Can I have one now?” Maybe my husband does the casual “just checking the edges” routine. And, finally, the powdered sugar—snow on a sunny morning—falls into a soft drift across the top. The first cut is always a little messy and always worth it.
Time-Saving Hacks
– Zest and juice your lemons earlier in the day and tuck them in the fridge; the rest comes together quickly when you’re ready.
– Line the pan with parchment so you can lift the bars out cleanly—cutting becomes much easier and neater.
– If your lemons are chilly, a quick warm-up in your hands helps them give more juice with less effort.
– Use one bowl for whisking the filling to keep cleanup simple, especially on a weekday evening.
– Don’t rush the cooling; giving the bars time to settle means cleaner slices and better flavor. Sometimes going slow is the time-saver.
Serving Ideas
– A little cloud of whipped cream and a few fresh berries turn these into a gentle dessert for company.
– For a cozy brunch, pair with eggs and a simple green salad—the tart-sweet bite balances the savory.
– Keep it simple on weeknights: small squares after dinner, maybe with hot tea or a minty herbal blend.
– For summer afternoons, serve chilled with iced coffee; in winter, warm a plate slightly and add a dollop of plain yogurt for contrast.
– Dust right before serving if your kitchen runs warm, so the snowy top stays pretty.
Tips & Mistakes
I’ve learned not to chase perfection. A small jiggle in the center as they come out is normal; it firms as it cools. If you overbake a little, the top may brown, but the flavor will still sing—don’t worry.
Don’t skip the zest. It brings that round, floral note that makes lemon bars feel alive rather than just sour-sweet. Also, wait until they’re fully cool before dusting with sugar. I’ve rushed it (impatient, hungry family nearby), and the sugar vanished like a magic trick.
Lining the pan is worth it. The first time I didn’t, I tried to coax a stubborn corner with a butter knife and ended up “taste-testing” two pieces to hide the evidence. And if you want neat slices, wipe your knife between cuts. It feels fussy, but it saves you from crumbs and smudges.
Storage Tips
I like to store these in the refrigerator, covered but not squished—either in a snug container or lifted as a slab on parchment. They settle into themselves overnight and taste even brighter the next day. Cold lemon bars with morning coffee is a tiny joy I fully recommend.
For longer keeping, they freeze well. I tuck squares into a tin with parchment between layers and pull a few out when we’re craving something sunny. They thaw quickly on the counter. If you prefer them a touch softer, give them a minute to warm—though I’ll happily eat them cold straight from the fridge with a fork.
Variations and Substitutions
If you’re feeling playful, try Meyer lemons for a softer, floral tang. A hint of orange or grapefruit can be lovely too—just enough to add a whisper of complexity. I’ve swirled in a spoonful of raspberry puree across the top once, and it gave the prettiest pink streaks and a friendly nudge of berry brightness.
For the crust, a gluten-free all-purpose blend keeps things classic. If you lean toward nutty flavors, a portion of almond flour adds warmth and tenderness; just know it browns a touch quicker and tastes a bit richer. I’ve used dairy-free butter with good success—slightly different texture, still very cozy. Coconut sugar lends a deeper color and caramel note; it’s nice, but the bars look more toffee than sunshine, so keep that in mind.
A little thyme or lavender can be magical if you’re careful—one gentle pinch for fragrance, not a garden party. And if you love coconut, a light sprinkle of toasted flakes on top (after cooling) brings a sweet crunch that plays well with lemon.
Frequently Asked Questions
Delish Gluten Free Lemon Bars
Ingredients
Main Ingredients
- 2 cup gluten-free all-purpose flour blend for crust
- 0.5 cup powdered sugar for crust
- 1 cup unsalted butter, melted for crust
- 0.25 tsp fine sea salt for crust
- 1.5 cup granulated sugar for filling
- 0.25 cup gluten-free all-purpose flour blend for filling
- 4 large eggs for filling
- 0.75 cup fresh lemon juice from about 4 lemons
- 2 tbsp lemon zest
- 1 tsp vanilla extract optional
- 0.25 cup powdered sugar for dusting, optional
Instructions
Preparation Steps
- Preheat oven to 350°F. Line a 9x13-inch baking pan with parchment, leaving overhang for easy lifting.
- Make the crust: In a bowl, whisk 2.0 cups gluten-free flour, 0.5 cup powdered sugar, and 0.25 tsp salt. Stir in 1.0 cup melted butter until a soft, sandy dough forms.
- Press crust mixture evenly into the prepared pan. Dock lightly with a fork and bake 18 to 20 minutes, until set and lightly golden.
- While the crust bakes, prepare the filling: Whisk 1.5 cups sugar with 0.25 cup gluten-free flour until no lumps remain.
- Whisk in 4.0 large eggs just until smooth (avoid excessive foaming), then whisk in 0.75 cup lemon juice, 2.0 tbsp zest, and 1.0 tsp vanilla.
- Reduce oven to 325°F. Pour the filling over the hot crust and bake 20 to 22 minutes, until the center is just set with a slight jiggle.
- Cool in the pan on a rack for 1 hour, then chill at least 2 hours. Dust with powdered sugar, lift out, and cut into 16 squares, wiping the knife between cuts.