
Delish Chocolate Mud Bars Recipes
Some desserts announce themselves before you even see them—the way chocolate winds through the house and settles into the corners like a soft blanket. That’s what these chocolate mud bars do for us. They bake up into deep, fudgy squares with a barely crackly top and a middle that feels like a hug you can slice. They’re the kind of treat you make when the day asks for something gentle. Nothing fancy, just pantry things and a bit of stirring, and before you know it, there’s a tray cooling on the counter, your coffee is half-drunk, and the kitchen feels calmer than it did an hour ago.
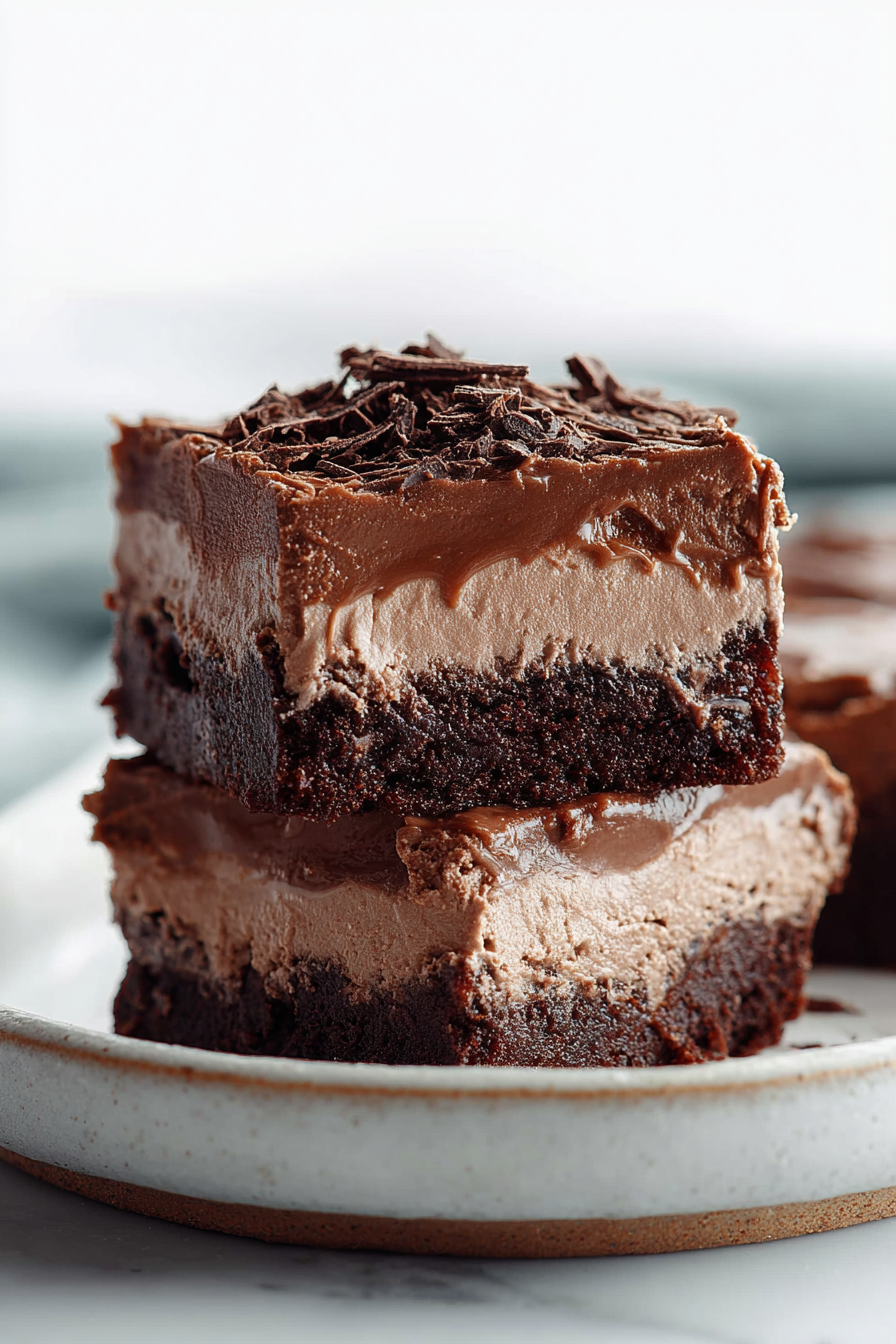
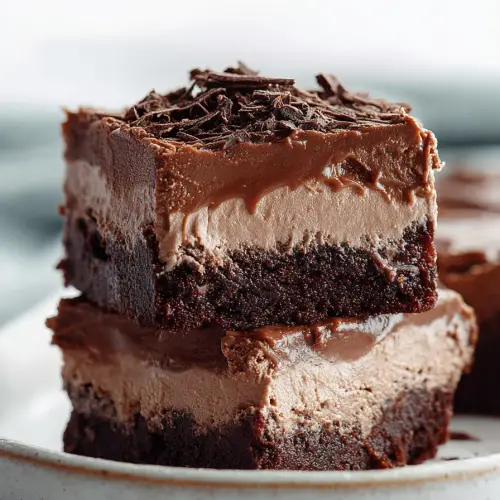
They’re special because they’re honest. There’s no gloss or glitter here—just rich cocoa, real chocolate, and a texture that lands somewhere between brownie and truffle. I love that they cut cleanly into sturdy bars for packing in lunchboxes, but also melt just enough under a warm spoon if you serve them with ice cream. They’re dependable in the best way. You know those days when the dishwasher’s humming, the kid’s homework is spread across the table, and you want a dessert that doesn’t need a pep talk? This is that dessert.
MORE OF OUR FAVORITE…
The first time I made them on a sleepy Saturday, I remember the morning light slipping over the sink, catching the dust in the air like glitter. Our little one dashed through the kitchen on socked feet, “taste-testing” with the kind of dedication that requires a second spoon. My husband pretended not to hover, but I caught him peeking at the oven clock twice. The dog stationed himself directly in front of the oven, tail thumping every time I opened the door to check for that wobbly, fudgy set in the center. Honestly, the whole thing felt like a family ceremony: someone responsible for scraping the bowl, someone in charge of the corner piece, someone guarding the cooling rack (hi, dog). And when we finally lifted the warm slab onto the cutting board—steam curling up, chocolate whispering out into the room—there was this small, shared pause. Like we’d all landed in the same sweet moment at once.
Why You’ll Love This Delish Chocolate Mud Bars Recipes
– It’s deeply fudgy with just enough chew, like a brownie that grew up and learned how to be extra cozy.
– The smell alone is worth it—warm chocolate drifting down the hall, nudging everyone toward the kitchen.
– Simple to mix, easy to bake, and forgiving if you get a little distracted by life’s interruptions (been there).
– Stays tender for days, which makes them great for lunchboxes, book club plates, or late-night nibbling by the fridge light.
– Plays well with others: a scoop of vanilla, a drizzle of caramel, a sprinkle of flaky salt—whatever your mood needs.
– Comforting any time of year: rainy Saturdays, snow days, or summer nights when you want something chocolatey and sure.
Slow Moments
There’s a quiet rhythm to making these. I put on a calm playlist and clear a little space on the counter, the kind of tidy that makes you breathe deeper. Butter melts low and slow while the coffee cools beside it. Cocoa dusts the air and leaves faint fingerprints on my apron. A wooden spoon moves through the batter like a small boat through still water. I’ll admit, I always pause to tap the spoon against the bowl twice—my grandmother’s habit—and watch the streaks settle glossy and smooth.
When the pan finally slides into the oven, the kitchen seems to lean in, waiting. The dog noses the warm air, hopeful. The kid pulls out cups and spoons, setting an “ice cream station” with serious concentration. And me? I lean against the counter, listening to the faint tick of the oven, and let it all happen slowly. No rushing. The bars puff slightly, the top turns shiny, and you can almost hear the chocolate sigh when you bring them out to cool.
Time-Saving Hacks
– Line your pan with a parchment sling so lifting the bars out is calm and mess-free.
– Measure dry ingredients the night before and keep them in a lidded jar on the counter—morning-you will thank past-you.
– Soften butter fast by cutting it into small cubes; it melts evenly with less babysitting.
– If you’re short on time, cool the pan on a metal rack near an open window. A little breeze works magic.
– Slow-down tip: letting the bars rest before slicing gives cleaner cuts and a fudgier middle. Worth the patience, truly.
Serving Ideas
– Warm squares with vanilla ice cream and a pinch of flaky salt—melty, dreamy, perfect.
– Afternoon coffee companion: a small bar and a quiet corner, maybe a mystery novel nearby.
– For weeknights, keep it simple: dust with cocoa or powdered sugar and call it good.
– Add a handful of fresh raspberries on top for a bright, tart contrast.
– Make it a sundae moment with whipped cream, toasted nuts, and a drizzle of chocolate sauce.
– Picnic-friendly: wrap bars in parchment and tuck into a tin. They travel beautifully.
Tips & Mistakes
I’ve learned a few gentle lessons here. Don’t rush the cooling; slicing too hot turns them into delicious chaos (still edible, still wonderful, just not tidy). Watch for overbaking—when the edges look set and the middle still has a soft wobble, you’re there. Use the best chocolate you can find; the flavor really shows up and does a happy dance. If your cocoa tends to clump, whisk it first so there are no sneaky pockets. I once tried to cut with a dull knife and ended up with craggy cliffs instead of bars. Now I wipe the blade between cuts and pretend I’m a dessert surgeon. Works like a charm.
Storage Tips
I keep the bars covered at room temperature for a couple of days, their fudginess only getting cozier. For longer, the fridge gives them a dense, truffle-like bite that pairs beautifully with a hot drink. If you like them warm, a short rest in a low oven or a quick zap softens the edges and wakes up the chocolate. They freeze well, too—wrap individually and stash for future you. A chilled square tucked into a lunchbox? Always a hit.
Variations and Substitutions
A spoonful of espresso powder deepens the chocolate without shouting “coffee”—I love it for evening bakes. Swirl in a ribbon of peanut butter or tahini for a nutty, grown-up twist. Chopped walnuts or pecans add gentle crunch; almonds are lovely, too. Around winter holidays, I fold in a whisper of peppermint extract and scatter crushed candy canes on top. Orange zest brings a bright note that feels a bit fancy without any effort. If you need to go dairy-light, melted coconut oil can stand in for some of the butter, lending a subtle, toasty sweetness. A gluten-free 1:1 flour blend has worked well for me—slightly more tender, still completely swoon-worthy. I’ve tried adding too many mix-ins before and lost that silky crumb, so I keep the extras thoughtful and minimal.
Frequently Asked Questions
Delish Chocolate Mud Bars Recipes
Ingredients
Main Ingredients
- 0.75 cup unsalted butter melted and slightly cooled
- 1 cup granulated sugar
- 0.5 cup light brown sugar packed
- 2 large eggs
- 2 tsp vanilla extract
- 1 cup all-purpose flour
- 0.5 cup unsweetened cocoa powder Dutch-process or natural
- 0.5 tsp baking powder
- 0.5 tsp fine sea salt
- 0.5 tsp instant espresso powder optional but enhances chocolate flavor
- 1 cup semisweet chocolate chips for batter
- 0.5 cup heavy cream for ganache
- 1 cup semisweet chocolate chips for ganache
- 1 tbsp unsalted butter for ganache, optional shine
Instructions
Preparation Steps
- Preheat oven to 350°F. Line a 9x9 inch baking pan with parchment, leaving overhang, and lightly grease.
- In a large bowl whisk melted butter, granulated sugar, and brown sugar until glossy and combined.
- Whisk in eggs one at a time, then whisk in vanilla until the mixture thickens slightly and looks satiny.
- Sift flour, cocoa powder, baking powder, salt, and espresso powder over the bowl. Fold with a spatula just until no dry streaks remain.
- Fold in 1.0 cup semisweet chocolate chips. Batter will be thick.
- Spread batter into the prepared pan and smooth the top.
- Bake 22 to 26 minutes, until a toothpick inserted near the center comes out with moist crumbs but not wet batter. Do not overbake.
- Cool completely in the pan on a rack before topping.
- For the ganache, gently heat heavy cream in a small saucepan until steaming (do not boil). Pour over 1.0 cup chips and 1.0 tbsp butter in a bowl; let sit 2 minutes, then stir until smooth.
- Spread ganache over cooled bars. Chill 20 minutes to set, then lift out with parchment and cut into 16 squares.