
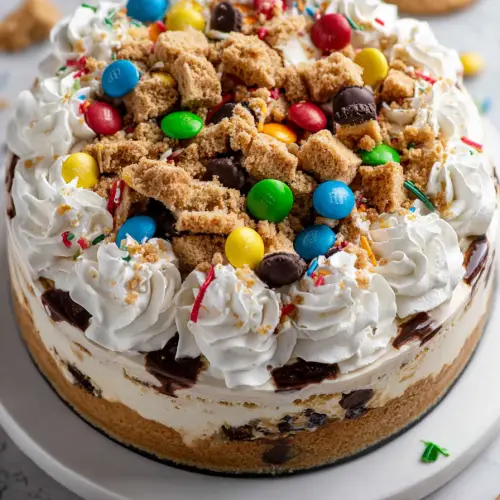
Delish Monster Cookie Cheesecake
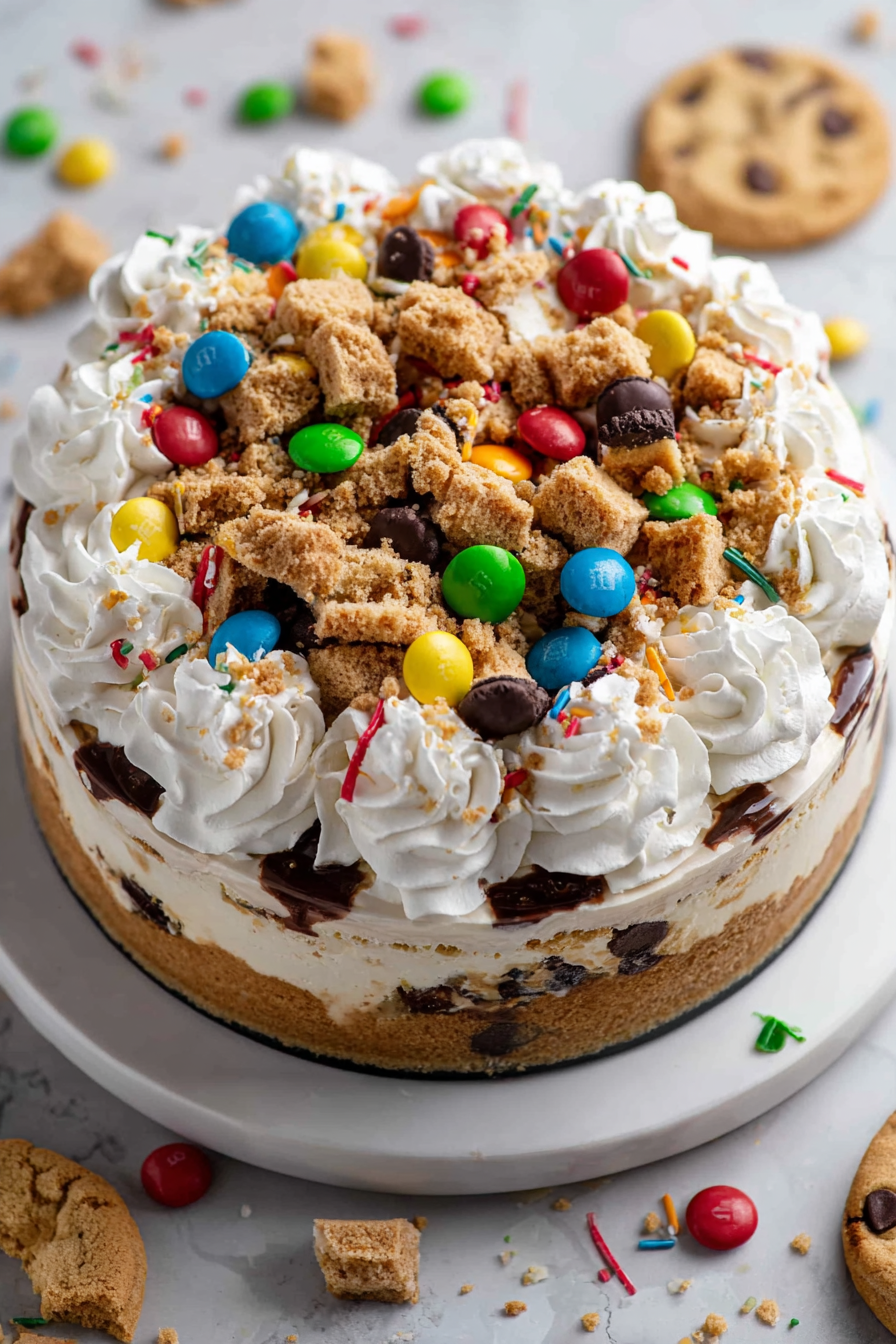
There’s something wonderfully playful about a dessert that doesn’t ask to be taken too seriously. Delish Monster Cookie Cheesecake is exactly that—creamy, plush cheesecake cozied up with the peanut-buttery, oat-studded charm of a classic monster cookie. Think velvety vanilla tang, freckles of chocolate, colorful candy peeking through like confetti, and a crust that tastes like your favorite after-school treat grew up, put on a sweater, and decided to be elegant. It’s nostalgic and celebratory all at once. The kind of sweet you bring to the table when you want smiles, not fuss.
What makes it special for me is the way the textures mingle. The cheesecake is silky, that soft hush of a bite that melts before you can think about it, while the cookie elements bring a friendly chew and a toasty whisper of oats. A ribbon of peanut butter here, a chocolatey snap there—it’s a dessert that keeps you nibbling, pausing, then going back in for another forkful because you’re curious what the next bite will feel like. Honestly, it’s pure fun, dressed as comfort.
MORE OF OUR FAVORITE…
The first time I made it, it was a rainy Saturday—the kind that keeps you in socks all day. The house smelled like vanilla, coffee, and the slightly toasty scent of oats warming in the oven. My son padded through the kitchen in dinosaur pajamas, stopping to stare at the colorful candy on the counter as if they might start singing at any moment. He asked if he could “help,” which meant mostly sneaking one or two bright dots, and my husband wandered in with a half-done crossword and a half-drunk mug, nodding approval like I’d made a very good life choice. Our dog parked himself by the oven, catching waves of heat and looking hopeful, which was adorable, even though we both know chocolate is off-limits for him. It was slow and ordinary in the best way—no big plans, just the quiet promise of dessert waiting in the fridge.
Why You’ll Love This Delish Monster Cookie Cheesecake
– It tastes like childhood met a special-occasion dessert—peanut butter, oats, and chocolate happily tangled in plush cheesecake.
– The texture is a dream: creamy middle, gently chewy cookie-style crust, and little pockets of chocolate that give a soft snap.
– It looks like a party slice—colorful candy peeking out and just enough whimsy to make everyone grin.
– It’s forgiving. A few cozy swirls and scatterings and it still looks charming, not fussy.
– The aroma while it bakes is pure comfort—warm vanilla and toasty oats drifting through the house like a blanket.
– It plays well with coffee, milk, or a late-night cup of tea—morning or evening, it just works.
– It keeps beautifully, which means you can make it ahead for a birthday, a potluck, or a slow Sunday.
Slow Moments
I like to put on a soft playlist—quiet guitar, a little piano—and let the room breathe. There’s a hush to cheesecake days, you know those quiet afternoons where time seems to stretch. The bowl’s heavy in my hands, and the batter turns glossy, catching the light from the window in slow ribbons. In those minutes, the kitchen becomes its own little world. I scrape the sides, taste a tiny swoop from the spatula, and it’s all there: the tang, the warmth, the faint sweetness leaning toward peanut butter.
My son darts in and out, sliding across the tile in socks, asking if the “candy pie” is ready yet, and my husband does that gentle shoulder squeeze on his way to refill the kettle. The dog sighs, settles his chin on his paws, and the whole house seems to lean into the quiet. When it’s baking, there’s the soft creak of the oven door and the little fog of heat on my glasses. Later, while it chills, there’s this small thrill of anticipation. I’ll be honest—I steal a look in the fridge every time I walk by, the way you peek at stars through a window, just to make sure they’re still there.
Time-Saving Hacks
– Use a simple cookie-style crust: if the day’s busy, a shortcut dough or pre-crushed cookie base brings you to the fun part faster.
– Make the crust in advance and tuck it into the fridge. A well-rested base behaves nicely and frees your hands later.
– Soften your cream cheese on the counter while you deal with everything else. It blends smoother and saves mixing time.
– Mix the batter in one sturdy bowl—less dish-washing, more ease.
– Chill it overnight when you can; the texture sets up like a dream and actually tastes better the next day.
– If you’re short on decorating time, scatter candy and drizzle a little warm peanut butter or melted chocolate right before serving—playful and done.
– Bake it the day before a party and keep it wrapped. Day-of, you’re calm, and your kitchen is tidy.
Serving Ideas
– For a cozy weeknight treat: small slices with cold milk or decaf coffee, pajamas highly encouraged.
– On a slower weekend: serve with a dollop of softly whipped cream and a handful of salty roasted peanuts for contrast.
– Add fresh berries—strawberries or raspberries soften the richness with bright, juicy notes.
– A little warm chocolate drizzle over each slice makes it feel bakery-fancy without any fuss.
– For friends who love peanut butter, a swirl of gently warmed peanut butter over the top adds a lovely sheen and deeper flavor.
– Coffee pairings: a mellow latte in the morning, or a simple French press after dinner. Tea lovers, try a malty Assam or roasted barley tea.
Tips & Mistakes
Don’t rush the chill. I’ve sliced too soon out of sheer impatience and ended up with a delicious but swoopy slice that needed a spoon. Letting it rest brings that clean, confident cut.
If you’re adding candy on top, wait until it’s cooled. I once sprinkled them while it was still warm, and they smudged their colors like a watercolor painting. Charming, but not quite what I intended.
Taste as you go. The sweetness can flex a little depending on your peanut butter and chocolate. A tiny spoonful now saves a furrowed brow later.
Use a gentle hand with any swirls—peanut butter, chocolate, whatever you’ve got. A few loops with a knife are plenty. Overworking muddles the look and the flavors.
And if a little crack appears on top? It’s fine, truly. A scatter of candy or a cloud of whipped cream turns it into character.
Storage Tips
I keep slices tucked in an airtight container in the fridge, and they’re still lovely for several days. The oats in the crust hold their chew, and the cheesecake keeps its silky sigh. If we’re being honest, the flavor deepens by day two—everything settles into itself.
For quick weekday treats, I pre-slice and separate pieces with parchment so they slip out easily, even when I’m juggling backpacks and lunchboxes. And for those early mornings when the house is barely awake, a thin sliver with coffee is a little secret breakfast joy. No judgment here.
I don’t recommend freezing the candy topping—it can lose its shine—though the cheesecake itself freezes nicely if wrapped well. Thaw in the fridge overnight, then add fresh candy or a drizzle right before serving.
Variations and Substitutions
If you’re aiming for nut-free, sunflower seed butter brings a toasty, earthy richness that plays surprisingly well with oats and chocolate. The color deepens a shade, and the flavor leans cozy and roasty.
For a lighter vibe, swirl in a spoonful or two of plain Greek yogurt into the batter before baking. It brings a gentle tang that brightens the whole slice without taking away that plush feel.
Chocolate is your playground. Mini chips melt into tiny pockets; chopped dark chocolate gives bold, occasional bursts. I’ve even scattered a few chopped peanut butter cups on top once—pure celebration.
Try a pinch of espresso powder in the batter if you want the chocolate to sing louder. It’s not a coffee flavor, just a deeper chorus behind the chocolate.
Seasonal twist: in the cooler months, a tiny scrape of cinnamon warms the crust. In summer, a bit of orange zest through the batter brings a sunny note that feels like a kitchen window thrown open.
Frequently Asked Questions
Delish Monster Cookie Cheesecake
Ingredients
Main Ingredients
- 2 cups graham cracker crumbs crust
- 0.25 cup quick oats crust, optional for monster cookie flair
- 0.25 cup light brown sugar crust, packed
- 0.25 cup creamy peanut butter crust
- 6 tbsp unsalted butter melted, crust
- 0.25 tsp fine sea salt crust
- 24 oz cream cheese filling, full-fat, softened
- 0.75 cup granulated sugar filling
- 0.5 cup sour cream filling, room temperature
- 0.5 cup creamy peanut butter filling
- 2 tsp vanilla extract filling
- 2 tbsp all-purpose flour filling
- 3 large eggs filling, room temperature
- 0.75 cup mini M&M's filling
- 0.5 cup mini semi-sweet chocolate chips filling
- 1 cup semi-sweet chocolate chips ganache
- 0.5 cup heavy cream ganache
- 0.5 cup mini M&M's topping
- 0.25 cup mini semi-sweet chocolate chips topping
- 1 cup whipped cream for garnish
Instructions
Preparation Steps
- Preheat oven to 325°F. Wrap the outside of a 9-inch springform pan with two layers of heavy-duty foil and line the bottom with parchment; lightly grease.
- Make the crust: In a bowl, combine graham crumbs, oats, brown sugar, and salt. Stir in melted butter and peanut butter until evenly moistened.
- Press the mixture firmly into the bottom and about 1 inch up the sides of the pan. Bake 8 minutes; cool on a rack for 10 minutes.
- Beat cream cheese and granulated sugar on medium speed until smooth and fluffy, about 2 minutes, scraping the bowl as needed.
- Mix in sour cream, peanut butter, vanilla, and flour just until combined.
- Add eggs one at a time on low speed, mixing just until incorporated after each addition; avoid overmixing.
- Fold in mini M&M's and mini chocolate chips. Pour batter into the crust and smooth the top; tap the pan gently to release air bubbles.
- For a water bath, place the pan in a large roasting pan and pour in hot water to come halfway up the sides; or set a pan of hot water on the rack below.
- Bake 50 to 60 minutes until the edges are set and the center wobbles slightly. Turn off oven, crack the door, and let rest inside for 60 minutes.
- Remove from the oven and water bath. Run a thin knife around the edge, then cool to room temperature. Cover and chill at least 6 hours or overnight.
- Ganache: Heat the cream just to a simmer. Pour over chocolate chips in a bowl; let sit 2 minutes, then whisk smooth and slightly cool.
- Spread ganache over the chilled cheesecake. Garnish with mini M&M's, mini chips, and whipped cream. Slice with a warm knife and serve.